Upscale Videos with CapCut Desktop Video Editor Like a Pro | Step-by-Step Guide
Blurry footage, pixelated clips, or old low-resolution videos—these issues can ruin the impact of your content, especially if you’re posting on platforms like YouTube, TikTok, or Instagram, where visual quality matters. That’s where CapCut Desktop Video Editor comes in. With its AI Video Upscaler tool, you can now enhance and sharpen your footage with just a few clicks, eliminating the need for prior editing experience. Whether you’re a content creator, small business owner, or someone looking to breathe new life into old videos, this guide will show you exactly how to upscale videos like a pro using CapCut on PC.

Why Upscaling Videos Matters

Before we proceed with the steps, let’s first understand why upscaling is essential. Upscaling improves the resolution and clarity of your video. Instead of looking fuzzy on HD or UHD screens, your clips appear crisp, vibrant, and professional. It’s ideal when:
- Your original footage is 480p or 720p, but you want to export in 1080p or 4K.
- You’ve recorded from older devices.
- You want to reuse older content but with a polished look.
- Your video gets compressed after uploading and needs a quality boost.
CapCut’s AI engine analyzes each frame to intelligently sharpen, denoise, and enhance it, resulting in smooth and cinematic upscaled videos without artifacts or jagged lines. Try other AI tools, such as AI Voice Generator, to add AI voices to your video; it will engage a wider audience.
How to Upscale Videos with CapCut Desktop Video Editor Like a Pro
CapCut makes video upscaling fast and easy for beginners. You don’t need to tweak complicated settings—follow these three steps:
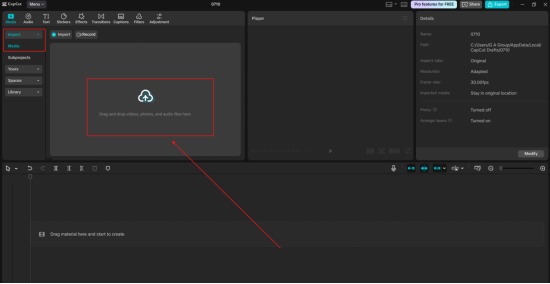
Step 1: Import Your Video into CapCut Desktop
Start by launching CapCut on your PC or laptop. If you haven’t installed it yet, download it from the official CapCut website. Once open, click on “+ New Project”. Drag and drop your video into the media library or use the “Import” button. Then drag your video onto the timeline to begin editing. Make sure your video is stable and well-lit before upscaling. CapCut features built-in stabilizers and brightness adjustment, as needed.
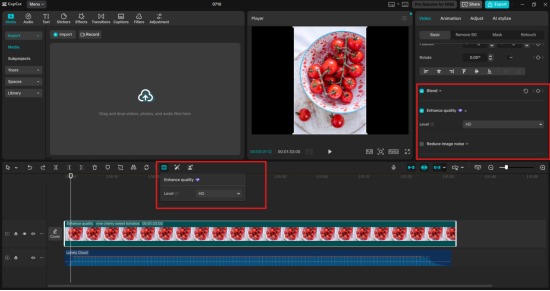
Step 2: Apply AI Upscaling Tool
Now comes the magic part. CapCut offers AI-powered video enhancementtools directly within the editing interface. To access it, select your video on the timeline. Navigate to the “Enhance quality” panel on the right sidebar. Select your desired upscale level; pairing it with the Stabilization tool will yield the best results.
The AI will process your video in the background, frame by frame. This may take a few minutes, depending on the length and quality of your original video. You can preview the results in real-time. Toggle the original and enhanced versions to see the difference. Try the CapCut Text to Speech AI tool to add narration to your videos.
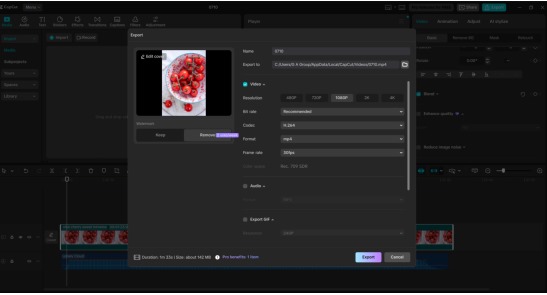
Step 3: Export Your Upscaled Video
Once your video is upscaled and you’re satisfied with the preview, click the “Export” button in the top-right corner. Choose your desired resolution—select HD (1080p) or Ultra HD (4K). Adjust bitrate, frame rate, and format (MP4 is recommended for most platforms). Click “Export” and let CapCut do its thing!
Your new, crisp, high-resolution video is now ready to wow your audience—whether you’re uploading to YouTube, showcasing a product, or saving a family memory. CapCut also allows you to export in vertical, square, or widescreen formats. Resize your video easily for Instagram Reels, TikTok, or YouTube Shorts without losing quality.
Extra Tips to Make Upscaled Videos Look Even Better
While AI upscaling provides a sharp video, incorporating a few finishing touches can elevate your visuals to the next level.
- Add Filters and Color Grading
Use CapCut’s built-in filters to enhance color tones. You can also fine-tune brightness, contrast, saturation, and warmth for a cinematic look.
- Use Noise Reduction
Sometimes, upscaling can introduce noise. You can smooth out grainy parts while preserving details. It will look amazing.
- Text & Graphics Stay Crisp Too
When you upscale a video with embedded text or graphics, CapCut’s AI enhances those elements as well. This is great for product demos or tutorials.
Why Choose CapCut for Video Upscaling?
CapCut stands out from traditional editors because of its speed, simplicity, and powerful AI. Many creators prefer it because it requires no technical skills, is free to use on PC, supports 1080p to 4K export, works with older or compressed footage, and offers one-click AI upscaling with real-time preview. You no longer need expensive software or hours of editing to make your videos look polished. CapCut provides studio-quality upgrades without stress.
Conclusion
If you’ve ever uploaded a video and felt disappointed by how soft or blurry it looked, upscaling with CapCut could be the solution. This tool makes it easy for anyone—whether you’re editing marketing content, family clips, or online tutorials—to transform old or low-quality videos into sharp, engaging visuals. So the next time you want your video to stand out, don’t settle for subpar quality. Open up CapCut, follow this 3-step process, and upscale like a pro. You’ll be surprised at how much clearer and professional your videos can look, with just a few clicks.